
Camera Components Overview
Front and Back
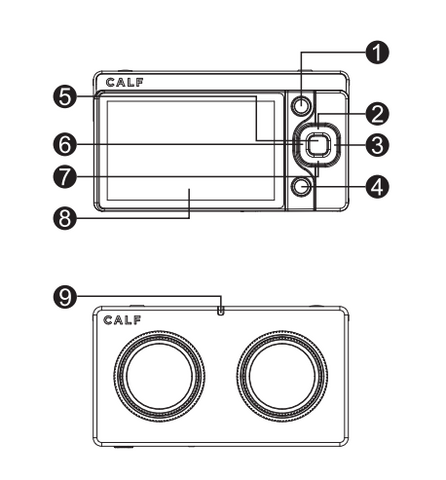
- Album Button
- Up/ISO
- Right/EV (Exposure Value)
- Back Button
- Menu/OK
- Left/White Balance
- Down/Exposure Settings
- Screen
- Status LED
Side
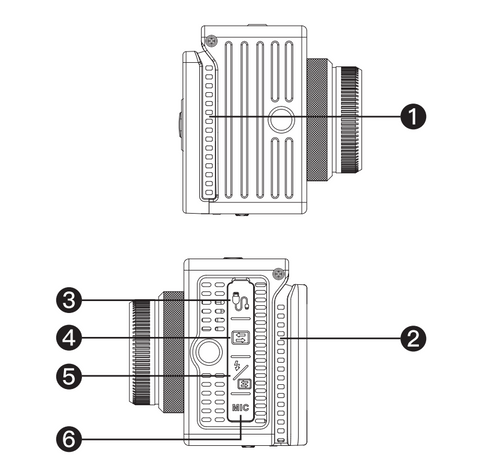
Caution: The third type-C port is the charging port
- Cooling Intake Vent
- Cooling Exhaust Vent
- Type-C USB2.0 HOST Port (for connecting digital microphones, network cards, etc.)
- Type-C 3.0 OTG Port (for connecting to a computer for data transfer and UVC function)
- Type-C 3.0 OTG Interface & Charging Port
- 3.5mm Microphone/Lavalier Port
Top, Bottom, and Interior
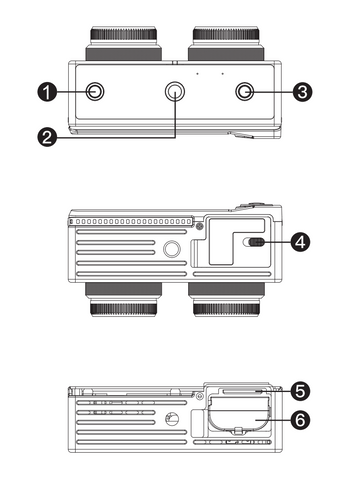
- Power Button
- 1/4-inch Screw Mount
- Shutter Button
- Battery Compartment Switch
- SD Card Slot
- Battery Compartment
Button Functions
Power Button
- Press and hold the power button for 5 seconds to power on the camera when it's off.
- Press and hold the power button for 5 seconds to power off the camera when it's on.
- If the camera encounters an issue preventing a normal shutdown, press and hold the power button for 10 seconds to force a shutdown.
Shutter Button
- In "Video" mode, press the shutter button to start recording a video. Press it again to stop recording.
- In "Live" mode, press the shutter button to start a live stream. Press it again to stop the livestream.
- In "Photo" mode, press the shutter button to take a photo.
- In "preview" mode, press the album button to enter the album browse mode. Press it again to return to preview mode.
Menu/OK Button
- In "preview" mode, press the menu button to access the camera's main settings menu. Use the up and down buttons to navigate through menu items. Press the menu button again to enter sub-menu items.
Back Button
- Used to navigate back to the previous screen or menu item in various interfaces.
Up Button
- In "preview" mode, it accesses shortcut settings for ISO.
- In the main menu, it is used to navigate up and down to select menu items.
- In the photo album, it serves as a shortcut for deleting files.
Left Button
- In "preview" mode, it accesses the shortcut settings for EV (Exposure Value).
- In the main menu.it is used to adjust parameters.
- In the photo album, it is used to switch to the previous file.
Right Button
- In preview mode, it accesses shortcut settings for white balance.
- In the main menu, it is used to adjust parameters.
- In the photo album, it is used to switch to the next file.